Monthly Archives: August 2017

Spaghetti Sauce – No Meat

Spaghetti Sauce is a staple at our house.  We use it for so many things.  It takes some work, but your kitchen will smell like Little Italy ~ it smells SO GOOD!  We’ve canned spaghetti sauce both with meat and without meat.  What we’ve found is that the processing time is much less and the jars much cleaner if you can it without meat.  If you can this with meat you’re looking at pressure canning it for 90 minutes, whereas; without meat it’s water bathed for 40 minutes.  This recipe yields 12 quarts and fills one roasting pan. You can also cook it in a stock pot.

Let the fun begin:

wp-image--778066227

  • 25 lbs of tomatoes
  • 4 large green peppers, seeded and diced
  • 4 large onions, diced
  • 4 cans (6 oz) tomato paste
  • 1 cup olive oil
  • 2/3 cup sugar
  • 1/4 cup salt
  • 8 garlic cloves, minced
  • 4 tsp dried oregano
  • 2 tsp dried parsley flakes
  • 2  tsp crushed red pepper flakes
  • 2 tsp Worcestershire sauce
  • 2 bay leaves

Tomatoes can be cored, quartered and processed through a juicer OR blanched, cored, peeled and cooked, depending on the texture of spaghetti sauce you prefer.  We juiced our tomatoes for this recipe.

wp-image-716591040

Dice the green pepper and onions.  Mince the garlic.  Combine all the ingredients in a large pot or roasting pan.  Simmer for 4-5 hours or until it’s the thickness you desire.

**Note – if using Roma Tomatoes, the Tomato Paste is not required.

wp-image-1704022651

Discard the bay leaves.  Jar up the sauce in sterile jars and add 2 tsp of lemon juice to each jar for added acidity (if desired).  The recipe that I used called for the extra lemon juice, however our tomatoes are very high in acid and we don’t add the lemon juice.  Wipe rims with a sterile cloth, place 2 piece hot lid and ring, tighten.  Waterbath for 40 minutes.

wp-image--1880492295

Canning Salsa with Mrs. Wages

We love salsa at my house….it fits right in with our Taco Nights.  We’ve made it different ways and this one seems to be a favorite.

When we make it, we use 3 packs of Mrs Wages at a time and it yields 16 pints.

We roast 1/3 of the tomatoes for 30 minutes on 350 degrees. In this case, it was 6 lbs of tomatoes cored and quartered.  We add to those tomatoes, 1 onion and 3 minced garlic cloves to a 9×13 pan and place it in the middle of the oven.

wp-image-1939510884.jpg

While those are roasting, I blanch, peel and core the other 12 lbs of tomatoes and start cooking them.  Add 1 and 1/2 cup of vinegar to the tomatoes, that’s 1/2 cup per pack of the Mrs. Wages.   Then we add Mrs Wages MILD Salsa mix to the tomatoes.

Once the roasted tomatoes are done, add those to the stock pot and bring to a boil.  At this point I use a submersion blender to change the consistency to thin instead of chunky.  My crowd prefers a restaurant style salsa rather than a chunky salsa.

Bring to a boil for 10 minutes.  We do boil and stir our batch longer, sometimes up to an hour.  The longer you cook it, the more water you will cook out of it. Then we waterbath it for 40 minutes per the instructions on the package of Mrs. Wages.

Ground Steak

Ground Steak truly is a Surry County, NC thing.  When you leave our area and mention Ground Steak, people look at you totally confused.  But in our little town of Mayberry, people line up at the local festivals for it, and you’ll find it on some of the local restaurant menus.  When we owned and operated a restaurant, we had friends and family that would drive 45 minutes to an hour for this stuff.  It’s a ground beef, flour, milk (or water), salt and pepper combination which is delicious on a bun.  So with that being said……it’s time to share the family secret…..

20170615_185653

  • Ground Beef
  • Self Rising Flour
  • Milk (or Water)
  • Salt & Pepper to taste….lots of Pepper!

Brown the meat until done, drain grease.  Reduce the heat to low and sprinkle flour on top of the meat and begin stirring.  This is what I call a texture recipe, it has to “feel right” when you stir it to know that you have enough flour to make it stick together.    If it’s not “gooey” add a little bit more flour.  If it sticks to the spoon in a big clump – you’re good.    Continue stirring over low heat.

Don’t fret, you’re about to change the texture yet again with the milk.  Add 1/2 cup of milk, per pound of meat.

Stir and mix until you get this texture.  Add salt and pepper and continue to stir over low heat.  At this point, you’re ready to sample.  If it seems too bland, lay on the pepper!

20170615_191631

Add a slice of tomato, some slaw and mayo….enjoy!  Or better yet, forget the bun and eat it by itself!

20170615_192220


Canning Tomato Soup

A friend passed along her mother’s tomato soup recipe and I had to try it!  Oh MY ~ this definitely gives Campbell’s a run for their money!  Since I was canning this, the one thing that I did do differently was leave out the corn starch, I will add a little bit of that as I heat it up.  Her original recipe added 3 tablespoons of corn starch along with the sugar and salt.

Ingredients:

  • 1 peck of tomatoes
  • 1 stick of butter
  • 2 bell peppers (diced)
  • 2-3 onions (diced)
  • 10 Tablespoons sugar
  • 2 Tablespoons salt

Blanch, peel and core tomatoes.  Cook tomatoes.  Cook peppers and onions in saucepan with butter until tender.  Add onions and peppers to the cooked tomatoes.

20170801_08090620170801_081256

Cook together for 10 minutes.  Add sugar and salt to the tomatoes and bring to a boil.

At this point I took a hand held submersion blender to my tomato mixture.

20170801_084307

Depending on how thick or thin you like you soup you can strain it.

20170801_085944

Put the tomato soup in hot, sterile jars, leaving 1/2 inch head space.  Wipe the rims to ensure that there’s nothing to keep the lids from sealing.  Place hot lids and rings on the sterile jars.  Water Bath for 20 minutes.

20170801_102457

Cold winter days….tomato soup…..grilled cheese sandwiches………..YUM!

Yields 10 – 12 pints based on how thick or thin you like your soup.

Healthy Guacamole

When Saturday nights roll around, we take advantage of any opportunity to get together with friends and have a Taco Bar!  I got in such a hurry making this one that I failed at making many pictures.  I was in a time crunch.  There’s a lot of manual prep work when you’re prepping food for tacos!

20170812_165650

  • 8 ripe medium avocados, diced
  • 1-2 limes, juiced
  • 1 jalapeno, diced
  • ½ medium red onion, diced
  • 2-3 medium cloves of garlic, minced
  • 2 roma tomatoes, diced
  • 1 large bunch cilantro, chopped
  • salt and pepper to taste
Cut avocados in half and remove seed. Cut the flesh into squares, scoop the flesh out with a spoon and add to a mixing bowl.  Squeeze lime juice over avocado squares.  Dice the onion, jalapeno and tomatoes, then add to the avocado.  Chop the cilantro and mince the garlic over the mixture and stir well.  Salt and pepper to taste.
If you like a chunky guacamole stop here.  If you like a smoother guacamole, take a mixer to it for just a minute, it will give it a much creamer texture.  Chill for 1 hr before serving.
20170520_185733
Sometimes we make the chunky version, but this time we made it creamy.  This is usually the last thing that we make right before guests arrive.  If it sits any length of time, it will change colors.
Enjoy!

Canning Peaches – Hot Pack vs Raw Pack

Peaches ~ yum!  Peaches and ice cream, peaches and pound cake, peaches and whip cream…..the list goes on!

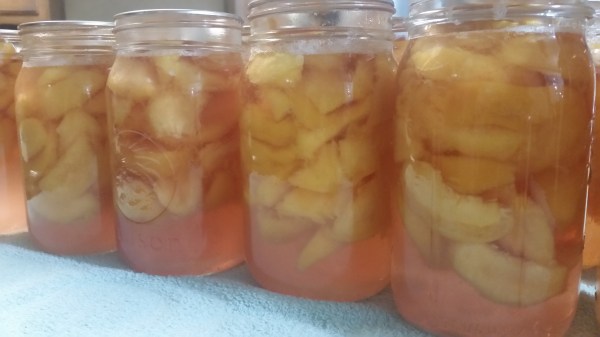
As many ways as there are to eat peaches you will find that many ways to can peaches.  Peaches can be canned so many different ways:  Hot Pack or Raw “Cold” Pack, light syrup, heavy syrup and even with natural juices and no “syrup” at all.  In the picture below, you will see a comparison of Raw Packed on the right verses Hot Packed on the left, notice how the raw packed peaches float.  Have you ever wondered why?  When you raw pack the peaches without cooking them first they contain oxygen which causes the peaches to shrink and float after being heated in the water bathing process.

20170724_061520-1

An average of 17½ pounds is needed for 7 quarts in order to fill your water bath canner. A bushel weighs an average of 48 pounds and yields 16 to 24 quarts – an average of 2½ pounds per quart – depending on which method you use to can the peaches.

Ingredients:

  • 1 1/2 gallon of quartered peaches
  • 1 gallon of water
  • 1 Tablespoon of vinegar
  • 1 Tablespoon of salt

Syrup:

  • 3 cup of sugar
  • 5 cups water

Regardless of which method you prefer, the first step is to blanch, peel and slice the peaches:

Blanch peaches for 30 seconds by dipping them in a pot of boiling water.  Remove peaches from boiling water and put them in ice water to cool.   At this point the skins will easily slide right off and can removed by hand.

Cut the peaches into slices or halves, depending on whichever you prefer.  Put cut peaches into a bowl with a mixture of 1 tablespoon of  vinegar and 1 tablespoon of salt per gallon of water.  Placing the peaches in the vinegar/salt water is just for “holding” until all of the peaches are peeled and sliced.  This vinegar/salt water solution helps prevent the peaches from changing color.

20170717_174328

Prepare the syrup mixture and bring to a boil until the sugar is dissolved.  Depending on the canning method that you use depends on if you add peaches to the syrup and cook or if you use the syrup to pour over the peaches.  See below:

HOT-PACK:  In a large stockpot place drained fruit in syrup, water, or juice and bring to boil.

20170723_213147

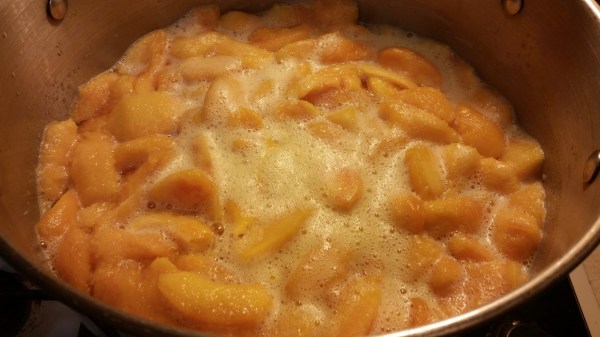
Fill jars with hot fruit and cooking liquid, leaving 1/2 inch head-space.  Place halves in layers, cut side down.  Hot-packing is the practice of heating freshly prepared food to boiling, simmering it 2 to 5 minutes, and promptly filling jars loosely with the boiled food.  Whether food has been hot-packed or raw-packed, the juice, syrup, or water to be added to the foods should also be heated to boiling before adding it to the jars. This practice helps to remove air from food tissues, shrinks food, helps keep the food from floating in the jars, increases vacuum in sealed jars, and improves shelf life.  Preshrinking food also permits filling more food into each jar.

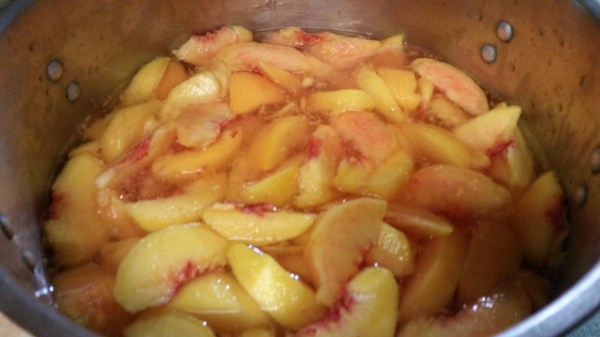
RAW-PACK:  Pack peaches in hot, sterile jars comfortably.  I use a “spaghetti spoon” to spoon the peaches out of the vinegar/salt water and place in sterile jars before I pour my sugar syrup mixture into the jars over the peaches.   Add warm syrup solution made with 3 cups of sugar and 5 cups of water leaving 1/2 inch head-space.  Raw-packing is the practice of filling jars tightly with freshly prepared, but unheated food.  The tighter you can pack the jars, the better.  Just don’t overdo it.  You can pack them so tight and full that they don’t seal.  Such foods, especially fruit, will often float in the jars.  The entrapped air in and around the food may also cause discoloration within 2 to 3 months of storage.

Remove any air bubbles.

20170717_180040

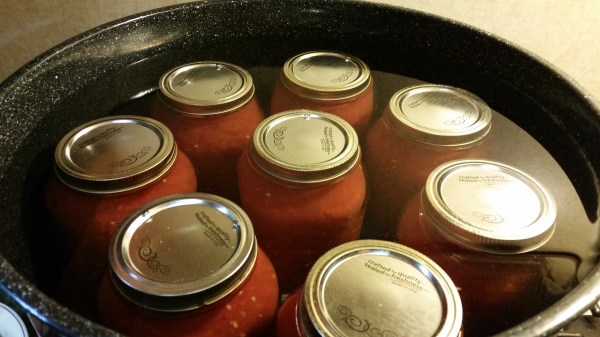
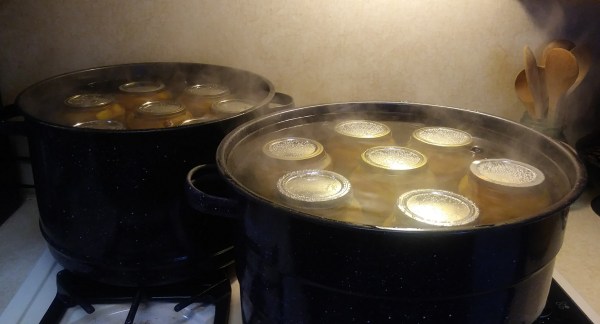
Wipe rim of jar to ensure a good seal.  Apply a warm lid and ring and twist tightly.  Water bath the peaches for 20 minutes.

**When preparing your water bath canner remember:  Cold Jars = Cold Water and Hot Jars = Hot Water.

20180820_093250-1

Hot Packed Peaches….

20180820_214047-1

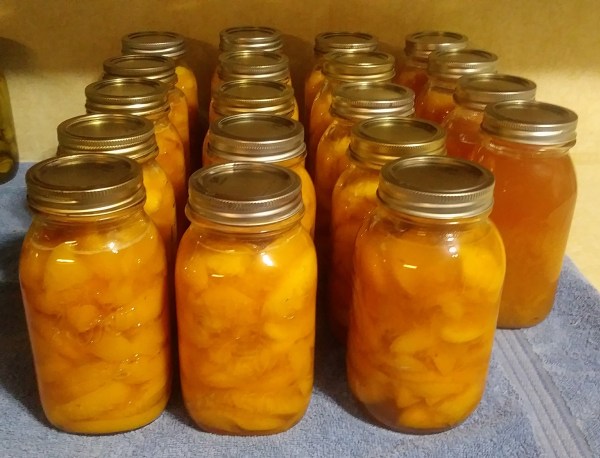
Raw Packed Peaches….

20170719_063032

See the difference?  Regardless of how you can them – both methods taste delicious!!!

Canning Tomatoes – “Hot Pack” Method

This is one of the very first things that I learned how to can and it’s a staple at our house.  If you ever researched the cancer causing ingredients in canned tomatoes that you buy at the grocery store you will never buy another store bought tin can of them.   We use these tomatoes in chili, soups, salsa, spaghetti sauce…you name it.  I try my best to can an average of 50 quarts of these a yr, that’s about 1 per week.  Red, Yellow, Pink – it doesn’t matter the color, for canning purposes a tomato is a tomato.

Blanch the tomatoes.  Peel the skins off and cut the cores out.

If you’re cold packing the tomatoes at this point you would put them in the jars with salt and process.  The difference between Cold Packing and Hot Packing is cooking the tomatoes down so that there’s no oxygen left in them to cause them to float in the jar.  When you see tomatoes and or other fruits floating in jars, chances are they were cold packed.  Refer to my canning peaches post for a good example and comparison.

20160922_170105

Cook the tomatoes.

20160922_182737

Skim all the foam off the top.

20160922_182127

Ladle the hot tomatoes into hot, sterile jars.  Add 1 tsp of canning salt per jar.  My Grandma and Mom added 1 tsp of sugar to the jars too.

20160922_184054

We water bath ours for 20 minutes.  I have seen people just put a hot lid and ring on them, cover and sit them aside.  And I’ve seen people water bath them for 40 minutes.