Category Archives: Recipes

Deviled Eggs

Do you have that one recipe that you make and you just don’t even think about it?  For my crowd some of those recipes are homemade biscuits, gravy, slaw and deviled eggs.  I often forget that people don’t make things from watching Grandma or experimenting.  Some of our best recipes we created from experiments!

Over Thanksgiving one of my sisters mentioned “a recipe” that she found online and used for deviled eggs.  So I’m putting this one out there for Sis….  Here’s how we whip up our deviled eggs.

First, we boil our eggs.  We have found it’s easier to peel the eggs if you get the water to a boil before you put the eggs in the water.  I used a slotted spoon to carefully lower my eggs in the water.  Once they have boiled 15 mins, remove the eggs and run cold water over them.  Peel the eggs, slice them in half and separate the eggs and the yolks.

20181122_094212

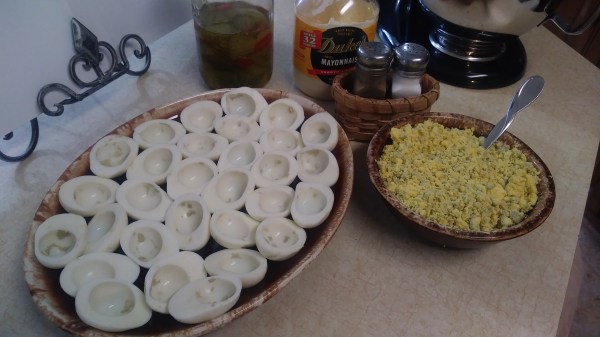
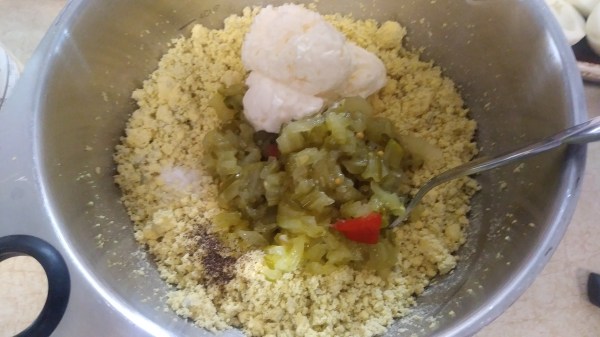
Mix the egg yolks with a heaping spoon full of mayonnaise, diced sweet pickles (or sweet relish), a sprinkle of salt and a sprinkle of pepper.

20181122_095106

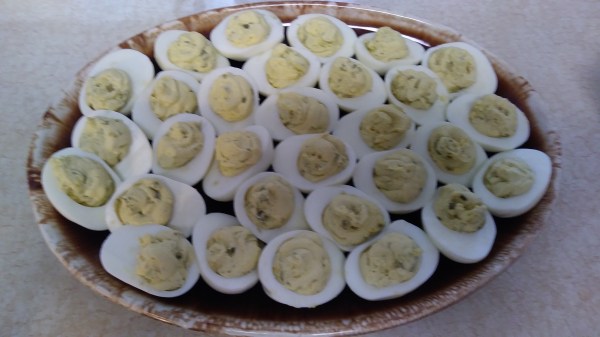
When you have the yolk mixture to your liking, put it inside a gallon size ziplock bag and cut the corner so you can easily squeeze the egg out of the bag.
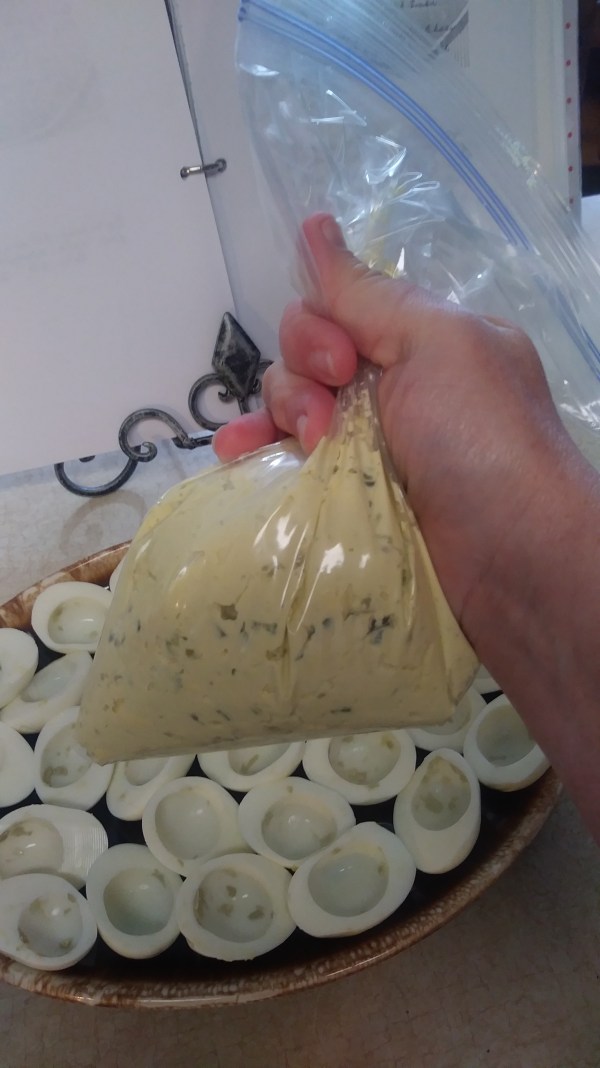
20181122_095643

Tada!

20181122_100347

Chocolate Chip Cookies

Just in time for Santa!!!

My Mama used to makes these when I was a little girl and all of the neighborhood kids wanted to hang out at our house…..partially for the cookies.  These are an all-time favorite when it comes to cookies.  They’re the best of the best, a hit with the Christmas Carolers and any function that involves food.

The recipe says that it yields about 5 dozen but I do good to get 4 dozen. (My crowd LOVES BIG COOKIES!)

Preheat oven to 350°. Beat butter and sugars at medium speed with a mixer until creamy. Add eggs and 1 1/2 tsp. vanilla, beating until blended.  Combine flour, baking soda, and salt in a small bowl; gradually add to butter mixture, beating just until blended. Beat in morsels just until combined. Drop by tablespoonfuls onto a well greased pan or parchment paper-lined baking sheets.

Bake at 350° for 10 to 14 minutes or until they’re done to your liking. Remove to wire racks, and cool completely, about 15 minutes.

Grab a glass of milk!!!

20181219_163906


Squash Pie

When squash is plentiful and we’re tired of fried or stewed squash, we like to try something new, something different, something good!   I ran across a recipe that looked interesting, after some adjustments we decided it was worthy of sharing.  My boys called it a “keeper” ~ they all went back for seconds!  Coming from picky eaters, I will take that as a compliment!  I made two of these as a test; one with meat and one without meat.  The one with meat was devoured, so it won!  We did discover that the Rotel taste was stronger in the vegetarian version. Why?  We’re not sure, but it was definitely different.

20180610_202623-1

Ingredients:

  • 2 lbs of sliced summer squash
  • 1 cup of diced onions
  • 1 lb ground burger; browned and drained
  • 1 can of mild Rotel; drained
  • 1 1/2 cup shredded cheese, reserve 1/2 cup for topping
  • 1/2 cup sour cream
  • 1/2 cup mayonnaise
  • 3/4 teaspoon salt + 1/4 teaspoon of salt
  • 1/4 teaspoon pepper

Preheat oven to 350 degrees.  In a pot add squash, onion and 3/4 teaspoon of salt, cover with water and simmer 8-10 minutes until tender.

20180611_065946

Strain squash and onions and set aside.

20180611_075259

Brown burger, drain and set aside.  In a large bowl, mix together squash, burger  and remaining ingredients, except the cheese for topping.  Pour the mixture in a greased casserole dish or pie plate, cover with cheese.

Bake until cheese is melted and the pie bubbles, about 25 minutes.  Wait 5-10 minutes before serving.  Serves 8 as a side dish.

20180611_180344_Film1-1


Fried Apple Pies

A family favorite for generations…..

Cooking fried apple pies is like winning the lottery.  Mention it and suddenly everyone is your friend!  Lol……..that’s a true story.  In reality, that’s a good thing because if we were to eat all 16 that this recipe makes oh my – talk about a sugar rush!

20180312_172517-1

We peel, slice and dry our own apples.  My grandparents used to have old fashioned “apple-dryings” where neighbors and friends would come over and they’d spend the day peeling, slicing and drying apples in the tobacco barn.  We still have access to those old tobacco barns, but we prefer to dry ours in the greenhouse.


If you don’t have access to dried apples, you can make these pies by using apple pie filling or fresh apples cooked down to make your own apple pie filling.

Ingredients:

  • 2 – 8 count rolls of Grands Biscuits
  • Flour
  • 1 Quart of Dried Apples (You can use canned Pie Filling or Fresh Apples cooked down into your own pie filling)
  • 1 1/2 cup of sugar
  • 1 Tablespoon Cinnamon
  • 1 Tablespoon Nutmeg

We cook our apples in water to reverse the dehydration process.  Fill the sauce pan 1/2 way full with water and 1 quart of dried apples.  Cook until tender then add spice and sugar.  Sample the filling to make sure that it’s sweet or spicy to your liking.


At this point we begin rolling out our biscuit dough on a well floured surface such as a cutting board.  Put a heaping spoonful of filling in the center, fold the pie crust over the filling and seal the edges. We use both our fingers and a fork to seal.  It’s important that you get the biscuit dough sealed so the pies don’t open up on you when flipping them in the frying pan.


We fry ours in Crisco but you can use cooking oil. Sometimes we fry these on a griddle, sometimes in a frying pan but my favorite way to fry them is in a Cast Iron Skillet.  As they turn golden brown we flip them and you can’t forget to “fry the edge”, the middle or the bottom as some call it.

Enjoy with caution as these will crash a diet – but they’re SOOOO GOOD!

Angel’s Stuffing – “Cross Creek Style”

Ok, so the”Cross Creek Style” is a inside joke.  If you know our gang and cook Thanksgiving dinner with our Sunday School class, you know that everyone likes to pick on Angel about Cross Creek. …we like to joke that this stuffing is “Cross Creek style” or Country Club style compared to your typical StoveTop stuffing.   Each year our Sunday School Class prepares a meal for our seniors, shut-ins and the less fortunate in our community.  What started out as feeding 100, followed by some good fellowship over dinner has grown over the years to feeding 300 plus.  As the numbers grow, so does the work load.  How do you get the extra hands lined up to help feed the multitude?  Announce that Angel is making her famous Thanksgiving stuffing and the volunteers come out of the woodwork!  Yes – it’s truly that good!  Just ask my sister who drives nearly 2 hours to join in the fun.

20171123_072614-1

  • Bread – 1 loaf cut into 1 inch square and dried out (day before)
  • Chicken Stock – 16 oz – OR until the stuffing is moist – but not soupy
  • Celery – 3 stalks
  • Onion – 1 diced
  • Granny Smith Apple – 1 chopped
  • Butter -2 Tablespoons
  • Sausage – 1 lb cooked and crumbled
  • Thyme – 2 sprigs fresh or dried to taste
  • Rosemary – 2 sprigs fresh or dried to taste
  • Sage – 2 sprigs fresh or dried to taste
  • Dried Cranberries – Optional

If time permits the night before:

  1. Cut the bread into 1 inch square and place in an airtight container to dry out.
  2. Brown the sausage, drain and set aside.  Once cooled, place in an airtight container and refrigerate.
  3. Dice an onion and place in an airtight container and refrigerate.
  4. Dice 3 stalks of celery and place in an airtight container and refrigerate.

If the bread still seems fresh, put it on a sheet pan in the oven for just a few minutes on broil to dry it out a little more.  Dice a Granny Smith apple and saute in 2 Tablespoons of butter with the chopped onions and celery until tender.

20171123_073334-1

Chop the fresh herbs and mix 1/2 of the herbs with 1/2 of the bread crumbs and sausage in a 9 x 13 pan or larger.  Add 1/2 of the onions, celery and apple to the bread, herb and sausage mixture.   Add a few dried cranberries if desired.

Once the stuffing mixture is all put together, soak with chicken broth.  We used 16 oz of broth to soak the bread mixture and it worked out great.  If you like a crispy stuffing, I recommend splitting this up into two pans.  As this recipe is written, it makes a thick, delicious stuffing.   Bake on 350 degrees until golden brown.  Enjoy!!!

20171123_102551


Apple Cranberry Crisp

This is one of those mouth-watering recipes that can be used as a side dish at Thanksgiving, Christmas or as a dessert for any holiday occasion.

20171118_143949-1

  • 3 cups chopped unpeeled apples
  • 2 cups whole raw cranberries
  • 1 1/4 cup of white sugar
  • 1/2 cup of water

Mix together the apples, cranberries and sugar in a casserole dish.  Top with 1/2 cup water.

20171118_145108

Topping:

  • 1 stick butter, melted
  • 1 1/2 cup of oatmeal
  • 1/2 cup brown sugar, packed
  • 1/3 cup all purpose flour
  • 1/2 cup chopped nuts, optional

Mix together the topping and sprinkle it over the cranberry, apple mixture.

20171118_145612-1

Bake for 1 hour on 350 degrees.  This is delicious as a side or as a dessert, warmed and topped with a scoop of vanilla ice cream.  Enjoy!!!

Pumpkin Pie

This is the month of Thanksgiving, Thankfulness, Pumpkin Spice everything, family gatherings and Pumpkin Pie!!!  For many years, Thanksgiving just wasn’t the same without my Grandma’s pumpkin pie.  It was one of those recipes I didn’t think about before she passed, but missed terribly once she was gone.  I’d tried to make it close, but something was always missing.  Then one day my sister mentioned having some of Grandma’s prized recipes and this was one of them!  Talk about EXCITED!!!  With Thanksgiving just around the corner, it’s perfect timing to release this recipe.

20161123_220517

  • Pie crust – 1 deep dish or 2 regular
  • 1/3 cup sugar
  • 1 teaspoon of salt
  • 1 teaspoon of cinnamon
  • 3/4 teaspoon ginger
  • 1/4 teaspoon cloves
  • 1/4 teaspoon nutmeg
    • (Or you can substitute the cinnamon, ginger, cloves and nutmeg with 2 1/4 teaspoons of Pumpkin Pie Spice)
  • 1/4 cup honey
  • 2 cups cooked pumpkin
  • 1 cup evaporated milk
  • 2 eggs

Preheat the oven to 425 degrees.  Mix sugar, salt and spices with honey and pumpkin.  Add eggs and milk.  Blend thoroughly (we use a blender to make is very smooth).  My Grandma always said the key to this recipe is to use a good blender to mix the ingredients.  Blend, Blend, Blend…..

20161123_221803-1

Pour the mixture into the pie crusts.   Notice the aluminum foil, that our way of keeping from burning the crusts.

20161123_222349

Bake at 425 for 10 minutes then reduce heat to 300 for 35 minutes or until the top starts to crack.  Note: The last 10 minutes of cooking time place pies on the bottom rack to cook the bottom crust.

Yields:  2 regular size pies or 1 deep dish pie.


Chicken ‘n Dumplings

As the weather cools, my crowd loves soups, stews and old fashioned Chicken ‘n Dumplings.  This recipe is an all time family favorite at our house.   I can remember standing over the stove as a little girl, waiting for the milk to boil so the dumplings could be dropped.  Making Dumplings of any sort is an art.  Once mastered, you can make all sorts of dumplings:  Pea Dumplings, Blackberry Dumplings, not just Chicken ‘n Dumplings.  Here’s how we done it on our family farm.

Boil 4 large chicken breasts until done.  Separate chicken and broth, set broth aside. Take a mixer and shred the chicken – you’ll never hand shred chicken again….


In a pot combine shredded chicken, 1 pint chicken broth, 1 quart of milk and 1/2 stick of butter.  Bring to a boil.

wp-image-1811757933

This is where you can do it one of two ways:  Biscuits from a can or Biscuits by hand.

  • Biscuits from a can:  Open a can of canned biscuits, such as Pillsbury Grands and cut them into squares and drop them in the boiling milk mixture.  OR….
  • Biscuits by hand:  Make your own dumplings like we do.  In a bowl start out with self rising flour, a heaping serving spoon of Crisco and splash of milk.  Mix with your hand, yes your hand….this is a texture recipe so you’ve got to use your hands.


Mix until it sticks to the spoon.  If the texture is too “soupy” add more flour, if it’s too dry add more milk.

wp-image-1888513315

Spoon the dumplings in the boiling mixture of broth and milk.  The heat will cause the dumplings to cook quickly and the inside of them will become light and fluffy like a biscuit.  You can use a fork to pry one open to test.  Once the dumplings are done, salt & pepper to taste and enjoy.  These are great warmed over the following day.

wp-image--2028145936

Ground Steak

Ground Steak truly is a Surry County, NC thing.  When you leave our area and mention Ground Steak, people look at you totally confused.  But in our little town of Mayberry, people line up at the local festivals for it, and you’ll find it on some of the local restaurant menus.  When we owned and operated a restaurant, we had friends and family that would drive 45 minutes to an hour for this stuff.  It’s a ground beef, flour, milk (or water), salt and pepper combination which is delicious on a bun.  So with that being said……it’s time to share the family secret…..

20170615_185653

  • Ground Beef
  • Self Rising Flour
  • Milk (or Water)
  • Salt & Pepper to taste….lots of Pepper!

Brown the meat until done, drain grease.  Reduce the heat to low and sprinkle flour on top of the meat and begin stirring.  This is what I call a texture recipe, it has to “feel right” when you stir it to know that you have enough flour to make it stick together.    If it’s not “gooey” add a little bit more flour.  If it sticks to the spoon in a big clump – you’re good.    Continue stirring over low heat.

Don’t fret, you’re about to change the texture yet again with the milk.  Add 1/2 cup of milk, per pound of meat.

Stir and mix until you get this texture.  Add salt and pepper and continue to stir over low heat.  At this point, you’re ready to sample.  If it seems too bland, lay on the pepper!

20170615_191631

Add a slice of tomato, some slaw and mayo….enjoy!  Or better yet, forget the bun and eat it by itself!

20170615_192220


Healthy Guacamole

When Saturday nights roll around, we take advantage of any opportunity to get together with friends and have a Taco Bar!  I got in such a hurry making this one that I failed at making many pictures.  I was in a time crunch.  There’s a lot of manual prep work when you’re prepping food for tacos!

20170812_165650

  • 8 ripe medium avocados, diced
  • 1-2 limes, juiced
  • 1 jalapeno, diced
  • ½ medium red onion, diced
  • 2-3 medium cloves of garlic, minced
  • 2 roma tomatoes, diced
  • 1 large bunch cilantro, chopped
  • salt and pepper to taste
Cut avocados in half and remove seed. Cut the flesh into squares, scoop the flesh out with a spoon and add to a mixing bowl.  Squeeze lime juice over avocado squares.  Dice the onion, jalapeno and tomatoes, then add to the avocado.  Chop the cilantro and mince the garlic over the mixture and stir well.  Salt and pepper to taste.
If you like a chunky guacamole stop here.  If you like a smoother guacamole, take a mixer to it for just a minute, it will give it a much creamer texture.  Chill for 1 hr before serving.
20170520_185733
Sometimes we make the chunky version, but this time we made it creamy.  This is usually the last thing that we make right before guests arrive.  If it sits any length of time, it will change colors.
Enjoy!