Canning Pintos

Canning Pintos – super easy and a huge time saver!  It’s nice to have them cooked and on hand.  There’s no waiting for a crockpot to cook all night or waiting to cook them for dinner.  Simply open a jar, heat and enjoy.

Recipe per quart:

  • 1 Cup of Dry Beans – these are Mixed Beans and Pintos
  • 1 tsp of Canning/Pickling Salt
  • 1 Piece of Ham (this pack makes 14 quarts)

Country Ham Chips

Remember – 7 jars will fit in the canner.  Layer in the dry sterile jars – 1 cup of beans, 1 piece of ham and 1 tsp of canning salt.  If you put the ham on the bottom, it leave a residue on the jar that will make them harder to clean.

FB_IMG_1464348622739

Fill each jar with warm water.  Wipe rims with a sterile cloth, place the boiled lids and seal.  Pressure can Pints – 1 hour, 15 minutes, Quarts – 1 hour, 30 minutes.

FB_IMG_1464348604073

This is what they look like as soon as they come out of the canner.  The longer they sit, the more they thicken.  I have found that if you have time to soak your beans over night that they do fill the jars more than if you can them dry.

Canning Jar Storage

Do I need more jars? YES!  Always!

Do not laugh or judge.  I know I am an OCD organized nut. Especially, when it comes to stuff around the house; canning jars and canning supplies are no exception!

This is just one corner of my basement, one corner of my stash:

20160526_073905-1

All washed, turned upside down, sorted by size and ready for canning.  I do run them through the dishwasher the day of canning.

Did you notice the bungie cords holding all of those rings?  No more digging through boxes, they’re easy to access and much neater.  I picked the bungie cords up at the local dollar store and they work great!

20160526_074436


The story behind “Preserving the Good Life”….

People are asking – What made us want to do a Blog and Facebook page and why did we name it “Preserving the Good Life”?  Preserving – Canning – Good Life is a pretty good summary of who we are – or at least a start!  Preserving / Canning is one of our many hobbies and it’s something that John and I enjoy doing together.  He’s the idea man, the one that says – “we’re canning strawberry rhubarb pie filling tonight” and I’m the one that puts the legs to it, the one that writes down the recipes, takes pictures and tries to explain it to where anyone can follow it.  Side by side, elbow to elbow we’re in this together.  We’ve canned for years and we love it!  Something you won’t see on here much is my hand written recipes.  I hand write every recipe in hopes my children will appreciate them one day as much as I appreciate the hand written recipes that I have had handed down to me.

We’ve had friends to ask us to teach canning classes; especially since it is a dying art.  We’ve even had friends show up on our door step with beans and jars in hand asking if we’d help get them started.  And that’s what we’re here for – to help and love each other, right?

As for the “Good Life” part, we truly do try to live a good life and that’s something that we want to hand down to our children.  A dear friend told me once, teach your children to love the Lord and the rest will come naturally.  I took those words to heart….now let’s try to teach them the lost art of canning, how to live better and make wiser decisions.  We’ll be sharing canning recipes as we can and we’ll be sharing family favorite recipes along the way.  If you’ve ever had the opportunity to eat any of John’s cooking – you’re in for a treat, he’s finally agreed to share some recipes!

“Good Life” covers many areas….I made a huge lifestyle change the 1st of the year.  And it’s paying off!  I have people ask me weekly – “How are you doing it?”, “What changes have you made?”, “What’s your secret?”.  I tell them all the same – there’s no secrets, no gimmicks or magic potions.  Simply eat what God gave you!  Natural not processed, water not sodas, limited dairy and limited sugar..  Know what you’re eating!  So to me the two go hand in hand, if I’m canning and preserving my own food – I know what’s going into it.  I know what sodium, preservatives and additives are in it.  I know the hands that’s prepared it and the cleanliness of the kitchen.  And most importantly I know what my family is eating!  It’s been a journey for sure, but if just one person can learn something from this, it’s well worth the effort!

So when it came to a name, I picked several brains, looking for the perfect name to describe the combination of ideas I wanted to share.  One friend came back almost immediately “Preserving the Good Life”….I hope you all love it as much as we do!

Strawberry Jam – No Pectin, No Sure Jell

FB_IMG_1464212784316

This recipe yields 12 jelly jars (8 oz)

  • 1 Gallon fresh berries – caped, washed and chopped
  • 8 cups of sugar – divided
  • 2 Tablespoons Lemon Juice
  • 2 Tablespoons Real Butter
  • 12 sterile jars, rings and lids

FB_IMG_1464212777414

Place the jars in the oven, heat to 200°.  Cap, wash and chop berries.  Measure berries.  An average gallon yields 8 cups of chopped berries; this is important.  For every cup of berries, you will need one cup of sugar.  Add berries and 1/2 of the sugar to a stock pot and bring to a boil over medium heat, stirring constantly.  Increase temperature to high.  Once it’s at a rolling boil, boil for 5 minutes, occasionally stirring.  Add remaining sugar, lemon juice and butter.   Bring to a rolling boil and boil for 10 minutes, stir occasionally.  Be sure to stir it enough that it doesn’t stick.  Skim off any excess pink foam.  Boil lids, fill hot jars with the hot jam and wipe the tops with a clean sterile cloth.  Place the lids, put the rings on and tighten.  Water bath for 10 mins.

FB_IMG_1464212756523

Water Bathing Instructions:  While cooking the berries, I start my canner of water on high.  Jelly jars require 1-2 inches of water over the jars.  If placed carefully you can get 12 jars in the canner.  Once the jars are ready and placed in there, I put a lid on the canner and bring it to a boil.  Once boiling, I boil for 10 mins.  Remove jars, cover with a towel and cool over night.  Don’t be surprised if your jars start sealing as soon as you take them out of the canner.

FB_IMG_1464212746279

Calories – What do calories really look like…

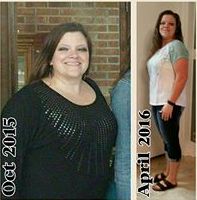
Calories – the dreaded word for anyone trying to cut back, do “good”, or eat better.  Why do we dread that word?  For me, it’s something I have to watch, something associated with things I loved….like cake and chocolate….It wasn’t until I understood the true definition of a calorie that the dread and fear went away.  Did you know that the definition of “calorie” is a unit of energy?  In the past few months, I have found there’s a HUGE difference in calories; good vs bad.  I pack my breakfast, morning snack, lunch and afternoon snack everyday.  My boys tease me and say that I eat all the time – and I really do!  There’s a lot of talk about healthier options at fast food restaurants, and there might be, BUT all that stuff is loaded with preservatives.  Try buying a happy meal and let it sit for a week, funny how it doesn’t change.  My apples change color before noon, their packs don’t change in a week – and I’ve been feeding that to my kids?!?!?  So that got my wheels to turning, unit for unit, calorie for calorie, what do my breakfast, lunch and snacks look like compared to McDonald’s healthier options…..are you ready for this?

Here’s what I eat most days before 5 pm, which is approximately 560 calories.

  • Breakfast:  2 boiled eggs
  • Am Snack:  Apple
  • Lunch:  Tuna pack, Salad and Carrots with Roasted Red Pepper Hummus
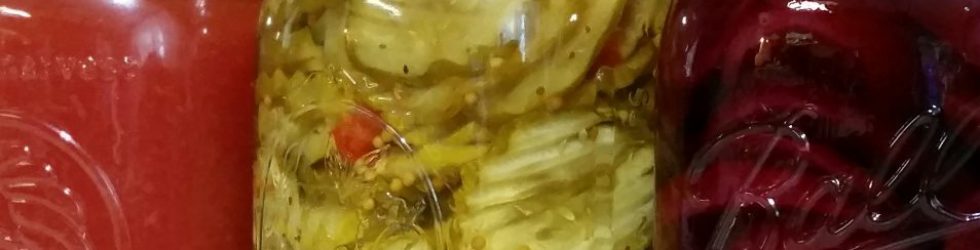
  • Pm Snack:  Grapefruit with 1 pk of Stevia in the Raw

20160524_090824-2

My salads consist of grape tomatoes, sprinkle of feta cheese and loads of spinach.  I make them on Sunday afternoons for the week ahead (I will cover weekly food prepping in another post).

20160523_081637-1

I mentioned Grapefruit with Stevia in the Raw, let me tell you – that grapefruit knife is a time saver.  I love it!

20160524_083201-1

Ok, so that’s what I eat on a regular basis – now to cover what I was eating.

When I would run by McDs for breakfast, I would grab the Egg White Delight.  That’s healthy right?  Well maybe….sort of….not really.  There’s a big difference in the sodium and carbs when compared to my 2 boiled eggs.  Those 2 boiled eggs are 140 Calories, 12 g Protein, 10 g Fat, 0 Carbs, 142 g of sodium.

2016-05-25 12.30.49

No morning snack….then I’d run out to lunch…..When grabbing lunch I would always go for the chicken sandwich, regular fry and a large unsweetened tea with 4 Splendas.  Being realistic here, we all know we’re tempted with the up-size, but I’d try to be good and only get the regular fries.  The sandwich and fries alone – 700 calories!  That’s more than I’m getting in breakfast, lunch and two snacks!

2016-05-25 07.44.56

McDs breakfast and lunch, without any snacks is 960 calories. Let that sink in a minute….2 meals – 960 calories verses eating every 3 hours, 2 meals and 2 snacks – 560 calories.  Since I got larger than planned by my love for eating, I think I’ll stick with the eating every 3 hours.

If you’re ever curious about calories in fast food, you can find it listed on most fast food chain websites.  This information came from http://www.mcdonalds.com


Chocolate Protein Balls

Often times, I hit a mid-afternoon slump where I crave something sweet.  These are super easy to make, delicious and have a powerful boost of energy! 20160524_084817-1.jpg

Mix the following dry ingredients:

  • 1/2 Cup of oats
  • 1/3 Cup DARK chocolate chips
  • 1/3 Cup of dry peanut butter  (PB2 or PBfit)
  • 1 Scoop of Chocolate WHEY Protein Powder
  • Sprinkle Flax seed
  • Sprinkle of Chia seed

In the microwave, in a glass container, heat 1/3 Cup of honey for 10 seconds.  Once heated, add to the dry mixture and mix well.  I form 10 balls and they average 110 calories each.  Keep refrigerated.

20160524_083541.jpg


How my life changed on January 5, 2016

My life changed forever on my 39th birthday, (January 5th, 2016).  I made a commitment to God, myself and my family that I was going to eat better, eat more of what God gave me and less processed foods.  The 2015 year was both eye opening and exciting for me and my family.  Things happened that forced me in front of a camera, something that I had dodged for many years.  One sister came home after 14 yrs and another sister got married.  When four sisters get together for the 1st time in 14 yrs you can bet there are cameras close by!  Both were very happy times for our family, the sad part was I didn’t recognize myself in the pictures!  What happened to the girl that I used to be?  Where did I go???  Fast and convenient had became my way of life.  I stayed on the go and my eating habits reflected my “grab-n-go” lifestyle.  It took the shock of seeing myself in those pictures to realize I had to make a change.  So, Jan 5th I joined the local gym and a new program called the Ultimate Weight Loss Challenge.  At first I felt like I had joined some sort of Food Anonymous program.  Those trainers wanted to know everything I put in my mouth each and every day!  I felt like I was going to confession every week, until I discovered I wasn’t the only one.  We discussed things that worked, things that didn’t.  We discovered that good nutrition is the key to weight loss.  It all boils down to – eat what God gave us:  fruit, vegetables, chicken, seafood, lean meats and limited dairy.  There’s no magic or gimmicks behind it, just lots of planning and prepping!  I log everything that I consume on myfitnesspal.com and my goal is to maintain roughly 1,200 calories per day.  I plan/prep my meals for the upcoming week on Sunday afternoons and I set small goals.  Do I workout?  Yes, but not everyday. My changes are working and I remind myself daily – Slow and Steady Wins the Race!  I average losing 2 lbs per week and I’m closer to my goal than I was 4 months ago, last month or even last week.  I’ve lost nearly 40 lbs so far!  “So far” – key words!  This journey isn’t over yet!  Stay tuned, I’ll have several pointers, recipes and prepping food plan ideas to share.

Me Before After


Canning Meatloaf

Meatloaf – Yes, Meatloaf – when pressure canned it can be a huge time saver during the week.  On average you get 1 quart of meatloaf per 1 pound of meat.  Do you have a favorite meatloaf recipe?  Great!  That’s a start!  This is canned using the cold canning process, meaning you start with cold sterile jars.  We make our favorite meatloaf recipe as if we were going to cook it, only in a bulk quantity – 20 lbs of ground meat at a time.  *80/20 blend works best, the leaner the meat, the harder it is to get out of a jar.  It’s hard to mix 20 lbs of meat at once, so we break it down to smaller batches and mix 3-4 lbs at a time, pack into the jars and repeat.  This is one time where using wide mouth jars is important!  Once all of the jars are packed, we boil the lids, wipe down the jar rims, place the hot lids on top and tighten down with the rings.  Place the jars in a pressure canner with cold water two-thirds of the way up on the jars.  Seal the pressure canner and turn it on high.  When the pressure builds in the canner, steam will begin to come out of the top.  Let it blow steam for 10 mins before you place the 10 lb weight on top.  *The lb of the weight varies depending on altitude.  When the weight begins to jiggle, set the timer for 90 minutes.  After 90 minutes turn the heat off, allow to cool and release all the pressure before opening.  I usually let mine sit over night.  Jars will be greasy, the meat has cooked and grease bubbled out of the jars before they sealed.  I wash my jars as I take them out of the canner.

Jars cold packed ready to seal.


Our recipe seems to change every year.  This year’s recipe has been a hit with our boys as they keep asking for more!  Our recipe makes 20 quarts so I have adjusted it to make only 7 quarts, since that’s what will fit in one canner at a time.

Ingredients ready to go!

  • 7 lbs of 80/20 ground beef
  • 1 large onion – diced and sauteed
  • 1 green pepper – diced and sauteed
  • 1 – 14 oz bags of stuffing mix
  • 1 cup of milk
  • 8 eggs
  • 2 cups of ketchup
  • Worcestershire sauce
  • Paprika
  • Black pepper
  • Garlic salt
  • Oregano
  • Ground mustard
  • Cajun seasoning

We divide our meat, onions and pepper into 2 batches.  One batch at a time, I mix the meat, peppers and onions together.  Then I add 1 cup of ketchup and 2 Tablespoons of Worcestershire sauce to the meat and mix well.  In a different bowl I mix: 1/2 bag of stuffing mix, 1/2 cup of milk, 4 eggs, 1 Tablespoon of each spice.  We have found mixing the dry spices in the dry stuffing mix works better.  Once you have everything mixed together add the stuffing mixture to the meat, mix well.  Add the meatloaf mixture to the jars and repeat.

Here’s the best part – when you’re ready to eat, simply open the jar, shake the meatloaf into a loaf pan, “glaze it” and heat on 350° for 20 to 30 minutes.  Our favorite glaze is a ketchup and brown sugar mixture and our 20-30 mins is until the glaze bubbles.  It’s cooked, all it needs is warming.

Finished Meatloaf


Water Bath Canning vs Pressure Canning

Have you ever wondered what the difference is between Water Bath Canning and Pressure Canning?  There’s a big difference between the two processes and when each method should be used.

Water Bathing is used mainly when canning food with high acidity such as:  tomatoes, fruits, pickles, jams, jellies and other preserves.  During the water bathing process, the jars of food are sealed and are covered completely with 1-2 inches of water, brought to a boil and then boiled for a specific amount of time.  Water bath canners are large pots with lids and wire racks inside.  The racks allow water to boil underneath the jars and keep the jars from bumping each other and breaking during the boiling process.

20160522_204822

Pressure Canning is used when canning foods with a low acidity such as:  vegetables, meats, poultry and seafood.  During the pressure canning process, the jars are placed in the canner with 2-3 inches of water, the canner lid sealed and then brought to a temperature of a least 240°.  By bringing it to this temperature, it kills the bacteria (clostridium botulinum) that causes botulism.  Pressure canners are heavy pots with lids that can be sealed off to prevent any steam from escaping and allow the pot to build pressure.  Some canners have gaskets like the Presto.  And some are metal to metal like the All American.  I have used both and both will come with a weighted pressure gauge and a wire rack.  NOTE:  Do not pressure can on a glass top stove.  I’ve heard of horror stories!

Other things you will need for canning:

Jars – the older the better, raid Grandma’s basementMason, Ball and Kerr jars are specifically made for canning.  Try to stay away from mayonnaise jars, baby food and pickle jars. They can’t withstand the heat during pressure canning.  Mayonnaise jars are ok for water bathing but not recommended.  They come in all sizes from 4 oz jelly to 1/2 gallon.

20160522_202408-1

Jar Lids and bands – Flat metal disc or “lids” with a rubber-type seal around one side near the outer edge, and a separate screw-type metal band, often referred to as rings. The flat lid may only be used once but the rings are reusable as long as they’re not dented or rusty.  Lids come in two sizes: regular mouth (like the ones pictured below) and wide mouth.  I have seen all kinds of lids.  I’ve had success with BALL and KERR.

20160527_065526-1

Jar lifter: perfect for removing hot jars from canners. Jar funnel: helps in pouring and packing food/juices into canning jars.  Lid wand: magnetic wand used for removing jar lids from hot water.  Clean cloths: for wiping jar rims and spills.  Narrow, flat rubber spatula or butter knife (not pictured): for removing trapped air bubbles before the jars. Laddle: a must for spooning hot liquids into jars. You can purchase a “canning kit” that will have the lid wand, jar funnel, jar lifter and spatula at most places that have canning supplies.

20160527_070537-1

Now that we’ve covered the basics, let’s start canning with confidence!