Baked Oatmeal

I have to switch things up to keep my boys interested and engaged in a meal prep plan.  If I do the same thing day after day, week after week, they get bored.  When searching for a recipe to offer them something different and nutritious, I found options of “Baked Oatmeal”.  I substituted some things, added some stuff and adjusted it to our liking…..

20170130_204938-1

Here’s your chance to get creative, blueberries and strawberries may not be your pick, so why not try apples or peaches….pumpkin..bananas…..your options are endless!  I have not tested the variations, because so far we love the mixed berries.  I will eventually switch it up and try them all.  As we try them I will update the post to let you all know what we think….

Preheat the oven to 350 degrees.  Spray a 9 x 13 baking dish really well.  Combine all the dry ingredients in one bowl and the wet ingredients in a separate bowl.  Slice or dice the fruit as needed.

20170130_210123

Dry Ingredients – Mix in one bowl.

  • 1/2 tsp salt
  • 3/4 tsp cinnamon
  • 1 1/2 tsp baking powder
  • 3/4 cup unpacked brown sugar
  • 3 cups old fashioned rolled oats

Wet Ingredients – Mix in a separate bowl.

  • 2 eggs
  • 2 ½ cups Almond Milk
  • 1 tsp vanilla extract
  • 4 tbsp butter or coconut oil, melted

Fruit

  • 2 cups berries (I prefer 1 cup blueberries and 1 cup strawberries mixed)  If you don’t like berries, there are different variations listed below.

In the baking dish layer 1/2 of the oats mixture, topped with 1/2 the fruit and then the remaining half of the oats mixture.  Pour the wet ingredient mixture on top.  Place the remaining 1/2 of fruit on top.

20170130_211107-1

Bake for 40 minutes until the oats are tender and it has a cake like texture.  Cut into individual servings and refrigerate.  This is great to eat straight out of the oven or warm up the next day.  It makes for a quick and easy breakfast or snack.

If you prefer a different variation, substitute the following in place of the 2 cups of berries.

Variations:

  1. Banana Nut – 1 cup of mashed bananas and 1/2 cup of pecans.
  2. Apple Cinnamon – 2 cups of diced apples
  3. Peaches n Cream – 2 cups of diced peaches
  4. Pumpkin – 1 cup of puree pumpkin and 1/2 cup pecans (for a little extra kick – add 2 tsp pumpkin pie spice!)

ENJOY!

Pork Chops with Apples, Red Onion and Brussels Sprouts

20170129_203633

One thing about cooking – I’m not afraid to experiment!  And a true test of “if it’s good” is if my 5 yr old eats it without being badgered.  This passed the test when he cleaned his plate!  The combination of flavors is amazing…I never dreamed garlic and cinnamon would go together, but WOW!  Talk about waking up the taste buds!!!   I’m a fan of pork, cinnamon and Granny Smith apples cooked together, if you’ve never tried the 3 together, you’re missing out.  (I have a great simple crock pot recipe for a pork tenderloin that uses cinnamon and apples.)

  • 4 Boneless pork chops
  • 2 Granny Smith Apples (sliced)
  • Brussels Sprouts (trimmed and halved)
    • To trim Brussels, cut the stalk ends off and discard.
  • Red Onion (sliced)
  • 4 Garlic Cloves (minced)
  • 1 tsp Cinnamon
  • 1 tsp Salt
  • 1/2 tsp Pepper
  • 3 Tbsp Olive Oil

Preheat the oven to 425 degrees.

Slice the apples, onion and brussels sprouts and arrange in a sheet pan.  Mince the garlic over the pan.

20170129_205248

I added a little extra cinnamon, salt and pepper by sprinkling it over the pan as I minced the garlic. Drizzle the pan with 1/2 the olive oil.  Be sure to coat everything with oil and spices.  You can peel, dice and add a sweet potato if you have one on hand and want to add some color.

Place the pork chops in a zip-lock bag, drizzle 1/2 of the olive oil over the meat, add the cinnamon, salt and pepper and shake!

20170129_205502-1

Place the pork chops on top of the brussels, apples and onions.  Bake for 25-30 mins until the pork chops are cooked thoroughly.

20170129_212832-1

Enjoy!!

Grandma’s Method of Canning Sausage

***DISCLAIMER*** Let me start by saying – No book will tell you to can sausage this way, but an 80 yr old Grandma in Southern VA will gladly show you “how her Mama done it”….  And if you post a picture on social media (in certain groups) be prepared for the backlash of – you can’t do that!!!  All I can say, is my family has done this for generations and no one has gotten sick or anything else from canning sausage.  I’m well aware of  the health cautions/concerns and that this may not be a USDA approved method….but….This is how we do it, it works, if done as instructed it’s safe and if I had one ounce of doubt, I wouldn’t dare do it….

There is no secret – but there is a key – you MUST cook your sausage completely done before canning.

Turn the oven on 200 degrees and place the jars in the oven for heating.

Roll out the raw sausage into patties and “do the math”.   Ask yourself – How many patties will my crowd eat at one sitting?  That’s how many you want to put in one jar.  And that’s the number you want to use while cooking to make sure you cook enough each time to evenly fill your jars.  At my house, the magic number is 5 and 5 fits nicely in a pint jar.  I prefer pints, I don’t see any reason why you can’t use quarts.  You’ll notice in the picture below we have 15 patties cooking which means I have a minimum of 3 jars in the oven and 3 lids boiling.  I boil my lids as I go since all of the patties don’t get done at the same time.

20160911_071422

One pound of sausage will average 1-2 pint jars, depending on how many patties you add per jar and how big you make the patties, etc.

Fry the sausage thoroughly like you’re going to eat it – right then.  Pack your magic number (serving size) into a HOT, wide-mouth, pint jar and pour the grease over the sausage.  Usually an inch or so of grease will do, there’s no magic measurement, we just use the grease from the pan and it always seems to be enough.

Wipe the rim of the jars really good!  Place a hot lid and ring on top, tighten down the lid and carefully flip it over.  Be sure to use an oven mitt, because these babies are hot!

20160911_073445

Now – cover with a towel and let them sit.  This is known as “Upside Down Sealing” and is often used with cured meats, jams and jellies.   The grease from the sausage will harden and help the jar seal.  The below picture is the morning after.  I store mine upside down, rings on them just like pictured.  When I’m ready to heat and serve, I pop the seal, toss the lid and heat the glass jar in the microwave for 1 minute to dissolve the grease.  Then we heat the sausage up in a cast iron pan for just a few minutes.  This makes breakfast a snap! Add the hubby’s homemade biscuits and I think I’ve taken a trip down memory lane! YUM!

20170125_074359

Many have asked what’s the shelf life for sausage – good question.  We try to can enough sausage for one year.  I have growing boys so this takes 50-60 lbs and we average running out right before “hog season”.  My grandma kept it a couple of years.  This is where you need to use your own judgment.  Enjoy and happy canning!

Baked Oatmeal Muffins

These are a great sure of fiber and energy morning, noon or night….plus they’ll keep you fuller longer!  I put them in the fridge both at home and work for mid afternoon snacks and needless to say they don’t last long.  You can top these with Blueberries, Raspberries, Strawberries, Walnuts….even Dark Chocolate Chips.

20170115_211934-1

  • 2 eggs
  • 1/4 cup olive oil
  • 1 cup packed brown sugar
  • 1/2 cup applesauce
  • 1 1/2 cup almond milk
  • 2 teaspoons vanilla extract
  • 1/2 teaspoon salt
  • 1 tablespoon cinnamon
  • 2 teaspoons of baking powder
  • 3 cups of old fashioned oats
  • 1 cup of your choice:  Blueberries, Raspberries, Strawberries, Walnuts, etc

Preheat the oven 350°.  Line the muffin pan with muffin liners.  This is important, or else they’ll stick, crumble and make a mess.

Mix the eggs, oil and brown sugar until smooth.  Add in applesauce, milk, vanilla, salt and   cinnamon.  Whisk until smooth.  Stir in the baking powder and oats.

20170115_213601-1

Pour the oatmeal mixture in the muffin cups until the cups are about 1/2 full.

Spoon in the berries and be sure to press them down into the mixture.  Bake 30 mins on 350°.

20170115_214345-1

Let them cool for 5 minutes before eating or putting them into container. These can be stored in the fridge or frozen.

Below is the nutritional value of the muffins with blue berries as I made them.

screenshot_2017-01-17-07-03-28-1


Chocolate Mousse ~ Rich and Skinny!

Attention Chocolate Lovers!   Here’s a recipe to try for a rich, smooth, creamy chocolate mousse…..

I’ve gotta confess right from the start…….I tried to slip this in on my boys but it didn’t quite work as planned because I didn’t get the avocados blended as well as I had hoped.  (I was in a hurry trying to hide the evidence!)  If they had any clue that I turned avocados into chocolate mousse, they would have never tried it.  I loved it!  My boys not so much, but they’re not chocolate lovers.

20170108_174320-1

  • 2 large ripe avocados
  • 1/2 cup chocolate chips, preferably dark chocolate chips
  • 3 tablespoons unsweetened cocoa powder
  • 1/8 teaspoon salt
  • 1 teaspoon vanilla extract
  • 1/4 cup almond milk
  • 1- 3 tablespoons of pure maple syrup (optional)

This really can’t get any simpler….

Melt the chocolate chips in the microwave stirring every 30 seconds.  Be careful not to let it burn.

In a blender or food processor, add all of the ingredients,  blend until smooth and thoroughly mixed.

20170108_180453-1

Refrigerate 5 minutes to 2 hours before serving.  Depending on how firm you want the mousse.  This yields 4 servings.  To reduce the calories leave out the maple syrup and use a lower calorie almond milk than pictured.

Enjoy!

Taco Soup

In the cold winter months this is one of my family’s favorite go-to quick and easy comfort foods.  It reminds me more of taco style chili beans than a soup.  My boys love it with tortilla chips, cheese and sour cream. I like it by itself or on a salad.  It’s super easy to throw together and loaded with stuff that’s good for you!

Looking at the picture below makes me realize that I need to add “make homemade ranch dressing mix” and “make homemade taco seasoning” to my to do list.  And….I just added to this year’s canning list:  Homemade Rotel!  Next season this picture will include all homemade ingredients!

20170108_165114

  • 1 lb of ground meat (beef, turkey or venison)
  • 1 pk of taco seasoning
  • 2 cups of water
  • Onion, chopped
  • 1 pk of dry ranch dressing
  • Rotel,  mild
  • 15 oz corn, drained
  • 15 oz black beans, rinsed
  • 2 – 15 oz pintos (or kidney beans),  rinsed
  • 2 – 15 oz tomatoes (for more heat you can use Pace Picante Sauce)

Dice the onion and slowly cook it in a stock pot.  Fry the ground meat in a frying pan.  I do this separately because I rinse the meat while I drain the grease.

20170108_171012

Once the meat is done, drain, rinse and add back to the frying pan.  Stir in the taco seasoning and 2 cups of water.  Bring to a simmer for 5 minutes.


Rinse the beans and drain the corn.  In the stock pot mix together the onion, tomatoes, Rotel, black beans, pintos, corn and dry ranch dressing mix.

20170108_172008-1

Add the ground meat and taco seasoning mixture to the stock pot soup base.  Let it simmer 20-30 minutes to let all the flavors combine, stir frequently.

Serve with tortilla chips, freshly shredded cheese and sour cream (or Greek yogurt) and enjoy!

20170108_181547

When I calculated the calories, this pot yields 8 servings at 325 calories per serving.

Canning Greens

‘Tis the season for greens, collards, kale, turnips.

This is a whole lot of work for a little yield…BUT it’s hard to beat home grown greens in the off season!  And these turned out SOOOOO good that I decided I needed to go back and pick more!   They seem to wilt down to nothing so don’t be surprised when it takes 4 grocery bags to yield 12 pints.

Here’s how we worked these up for canning:

Cook the greens down.  We put ours in a stock pot, filled 1/4 full with chicken broth and water, 1/2 broth, 1/2 water.  Let them simmer down until all the liquid was gone and the greens were tender.

Put jars in the oven for 200 degrees to get them hot while the greens are cooking.  And put on a pot of water to boil for topping off the jars.

Once the greens are ready to can, put 1 chunk of meat per jar as pictured.  We used ham chunks, you can use “fatback”, whichever meat you prefer for seasoning.

20161127_072721-1

Put the greens in the hot jars, topping with 1/2 tsp of canning salt per pint.

20161127_073001

Fill with water, leaving 1/2 inch head space.

20161127_074346

Use a knife to get out any air bubbles.

20161127_074647

Wipe the rims with a sterile cloth, place hot lids and rings, seal and pressure can on 10 lbs of pressure:

Pints:  1 hour 10 minutes

Quarts:  1 hour 30 minutes

20161127_140047

We opened our first jar for New Years, that’s what prompted me to go pick more!  They’re  THAT GOOD!

Goodbye 2016, Hello 2017!

As I say goodbye to 2016, I say goodbye to a lot of things….Goodbye carbonated drinks!  Goodbye processed foods!  Goodbye 50 lbs!  Goodbye old me!   In saying goodbye to those processed, fried foods and “junk” I also said goodbye to high blood pressure, heartburn and acid re-flux.  I made some pretty big lifestyle changes in 2016 and I plan to make some bigger changes in 2017! Let’s keep this ball rolling…..

In January of 2016 my dietary goals were:

  • Eliminate processed foods
  • Eliminate carbonated drinks
  • Use more real ingredients and preserve more homegrown foods
  • Throw away those blood pressure pills!
  • Lose 60 lbs

I achieved a lot of those goals….

  • Processed foods are no longer a staple in my pantry. Instead of opening a box of macaroni and cheese, or a tin can of peas, potatoes or corn, I go to the basement and bring up a glass jar of home grown peas, potatoes or corn. Macaroni and cheese was once a weekly side dish and I’m proud to say that my boys haven’t had it but twice in 2016 (that I know about).
  • I can count the number of carbonated drinks I’ve consumed this year and still have fingers left over!  I once was a 2 or 3 a day Coke Zero offender, but now my taste buds have changed so much I can hardly stand the taste of one….
  • We canned over 800 jars of food this year, that in itself speaks volumes.  My boys put 5 deer in our freezer between Thanksgiving and Christmas so there will be lots of venison on our 2017 menu!
  • My blood pressure pill(s) have been long gone thanks to the 50 lbs that I lost and my dietary changes.
  • I didn’t quite reach my 60 lb goal and I have bounced a little through the holidays but that’s okay; I’m human and I know how to fix it!  Life happened, I got busy on the Labor of Love project and my Sunday Funday Prepday became a day that I spent doing other things rather than planning.  When I went shopping for jeans this past Black Friday, I was shocked when I tried on jeans.  I walked into the dressing room with 3 pairs and I walked out with the smallest pair – a pair of jeans literally 1/2 of the size of what I wore last year!

collage-2016-12-17-21_37_26

2017 Health GOALS, not Resolutions (who keeps resolutions?!).  Set a GOAL and strive to achieve it!

  • Drink more water
  • Pack our lunches 5 out of 6 days
  • Eat supper at home 5 out of 6 days
  • Throw away less food!
  • Reduce caffeine intake, I LOVE COFFEE!  (Doesn’t mean I have to love the caffeine.)
  • Take more walks
  • Lose those last 10-15 lbs!

Drink more water, it’s not like I’m drinking anything else (except coffee), I just dont drink enough.  I say pack “our” lunches and 5 out of 6 days because I am a Homeschool Mom that works with my husband 6 days a week and we homeschool our boys at our business.  So the 4 of us are together 6 days a week, 9 straight hours!  Our goal is to reduce our eating out to one lunch and one dinner out each week. This is somewhat a multipurpose goal, eat better and save money at the same time. Maybe this will help with our “throwing away food”!  With all good intentions, I like to shop fresh; the problem is, the fresher, organic foods have to be eaten faster than the preserved foods.  I have got to find that happy medium, I hate throwing away any food.  If you know me, you know I LOVE COFFEE as in morning, noon and night.  Those pots after 12pm need to become Half caf, then Decaf.  I’m killing my adrenaline gland!  More walks ~ I need to learn to walk away and walk down the street at least once a day.  With a business right on Main Street – I have no excuse!  If I focus on these goals, the weight will take care of itself.  I strive to keep the 2016 goals rolling, they were truly lifestyle changes that were life changing!  I plan to add the 2017 to the list and keep on kicking.

Watch out 2017 – here I come!

e1492aa9e7ea181dc185c37fac2740c0

Labor of Love

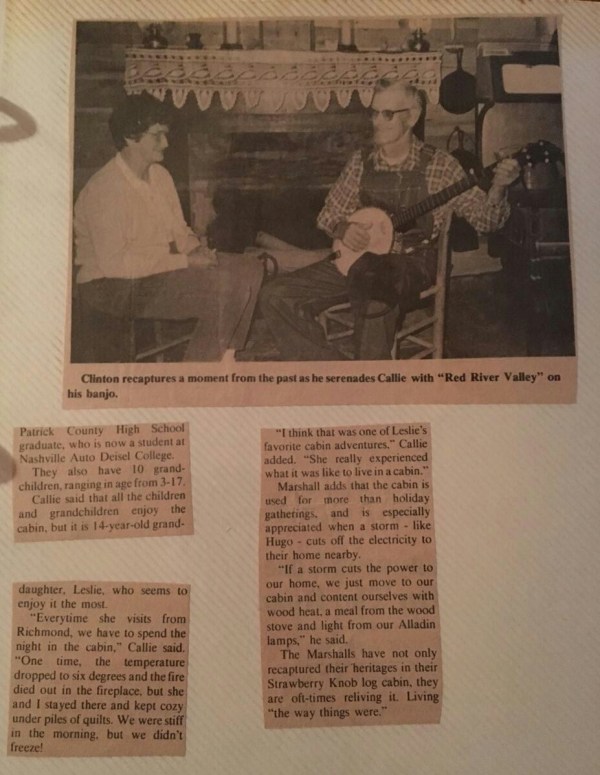
I don’t know where to even begin in writing this post, my heart is so full….so let’s just start at the beginning.  A friend sent this article to my husband, it’s an article that I hadn’t seen in years, it explains the history behind the family cabin…..”Recapturing A Heritage”, Callie and Clinton Marshall were my grandparents.

img_1350-1img_1354-1img_1352-1

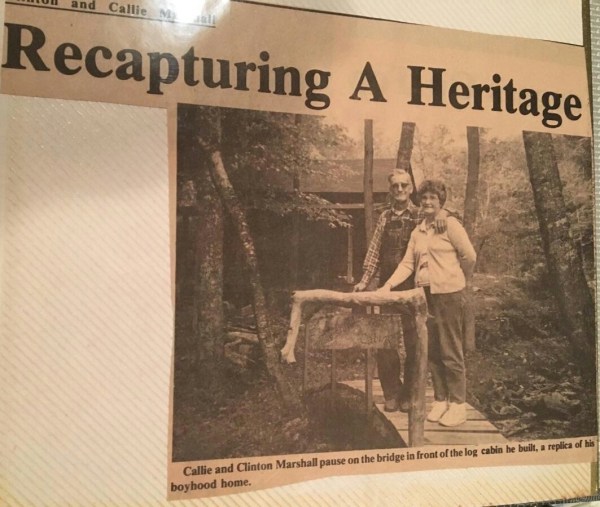
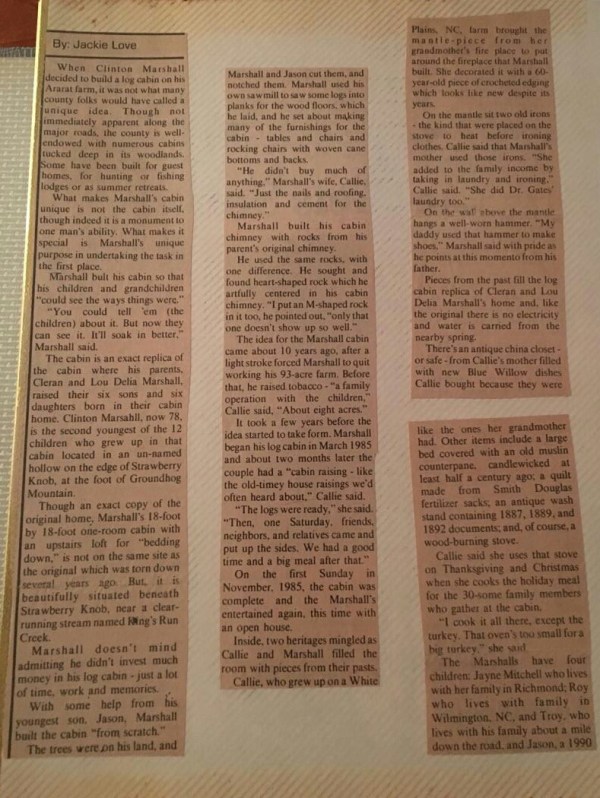
In 1985, when I was a young child, my grandfather built this one room cabin as a replica of what he grew up in.  He wanted his grandchildren to see what it was like to grow up in a simple cabin with no power, no running water and the bare basics like he did.  This cabin sits at the foot of the mountain, on the family farm, back in a little corner surrounded by shallow creek.  To me it’s one of the most peaceful places on earth,  often referred to by my Grandmother as “a ‘lil peace of Heaven”.  The older I get, the more I understand why she called it that.

Growing up I would help my Grandmother clean the cabin every Spring, Fall and before special occasions.  We would dust the family heirlooms, wash windows and sweep, it’s harder to clean than you think with no running water or electricity.  The guys would weed-eat and clean up outside, clearing limbs from the creek and cleaning up the best they could.   As my grandparents aged and later passed on, I continued to clean the cabin every Spring,  Fall and special occasion just as I did growing up.  My grandparents put such love it that place, it was the least I could do, not to mention it’s filled with such memories of sleepovers, fish frys, chicken stews and Christmases past.

fb_img_1482796195390

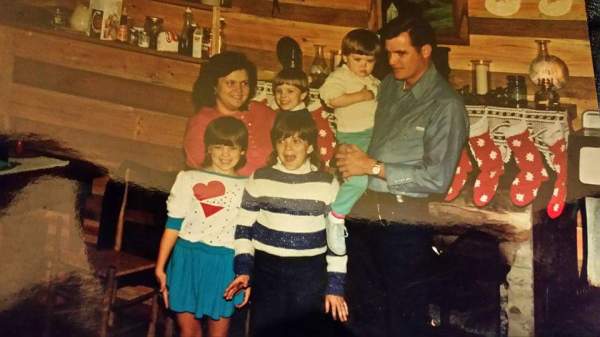
This picture is of my family the Christmas of 1985….

Another family member inherited this lil piece of heaven but that didn’t stop the love I poured into it. I’m fortunate enough to live about 20 minutes from the property and be able to help take care of the upkeep.  What I wasn’t able to do was make all the much needed repairs without his permission and my father’s help.  That’s where God stepped in and the rest is history.  Since the 1st of August we have worked diligently, tirelessly and weekly on this cabin making the much needed repairs.  My father went at this project with a passion and if you know him, you know, when he’s on a mission the job is going to get done!

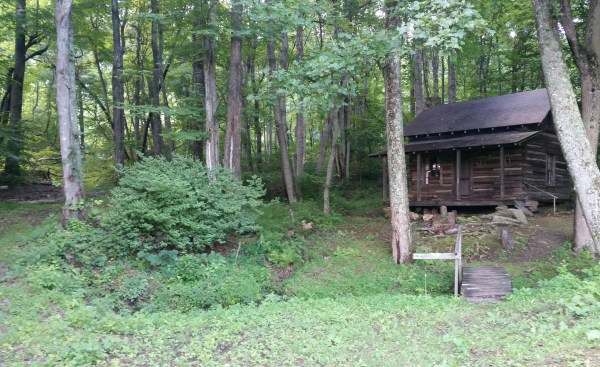
Here’s how the cabin looked late July…

20160806_160849-1

The project started with bulldozing behind the cabin to make room for a back porch.  We spent a Saturday building a back porch to help keep the water off the back of the cabin to help preserve the logs.  As it was, the back of the cabin stayed wet and the logs were rotting.  Opening and closing the back door became a challenge as the water had damaged the framing.

20160820_170011

There’s a spring head just to the side of the cabin that ran to the creek and left a swampy mess behind it.  We dug a 100 ft ditch from the spring to the creek and spent a Saturday building a “blind” ditch to bury the spring head so it could drain into the creek and not leave the swamp behind.  Later the boys hauled in loads and loads of black mountain dirt to cover the ditch and make a yard.

We tore the old shingles off of the porch to realize that boards needed to be replaced before our roofing party.  We replaced the rotten boards and replaced the old moss covered shingles with a new tin roof.

We tore out old wooden chinking which had strips of insulation tucked in behind it. That was a nasty job as the mice had resided in those cracks for 30+ yrs and it made for a perfect doorway for the snakes.  We  found 4 snakes during this project!  As we cleaned that out, a man by the name of, Blanchard Montgomery went behind us and filled those cracks with cement.  It’s a true art to do that type of work and Blanchard done a beautiful job.

During the removal of chinking we found four logs that desperately needed replacing, that lead to another day’s project.  The Montgomery boys helped my father that day, they literally found a Pine tree and took it from standing, to the sawmill to the cabin walls.  That adventure was educational in itself.

Another day was spent replacing the molding and fine tuning the back door.  As it was, the door would barely open and close and took “holding your mouth right” to get it to shut properly.

Another full day (or two) was spent making a newer, more stable bridge to replace the one that was tattered and rickety due to age.

At this point, projects were beginning to wrap up and the cabin was finally mouse and snake proof, so the cleaning began…but 1st, we needed lights.  So we installed 4 LED lights to run off of a battery.  The cabin is so tucked in to the base of that mountain that you had to pipe in sunlight.  When the lights came on, wow, not only was I able to see the craftsmanship that went into the cabin, I was able to see all the dust and spiderwebs.  It took a week’s worth of generator operated vacuuming, elbow grease, corn oil and Murphy’s Oil Soap to get it clean enough to suit me.  I took every piece of glass and linen home to wash it.  We spent a day reworking every piece of cast iron.

The cabin is filled with four generations of family heirlooms, such as; receiving gowns that my great-grandmother wore, a picture of my great-great-grandmother, a hammer my great-grandfather used to mend shoes and irons that my great-grandmother used to iron clothes for the Dr of the community, Dr. Gates.  So much history under one roof.

Now it’s time to enjoy it and make some memories!  We had our 1st Christmas there in 12 years this past Christmas.

Stay tuned for the renovations to come in 2017……


Spiced Hot Fruit Bake

20161218_080812-1
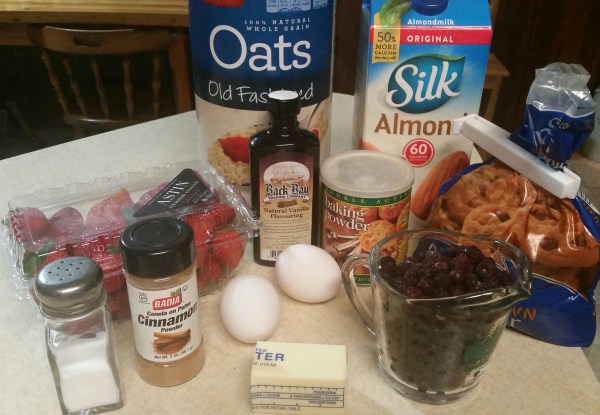
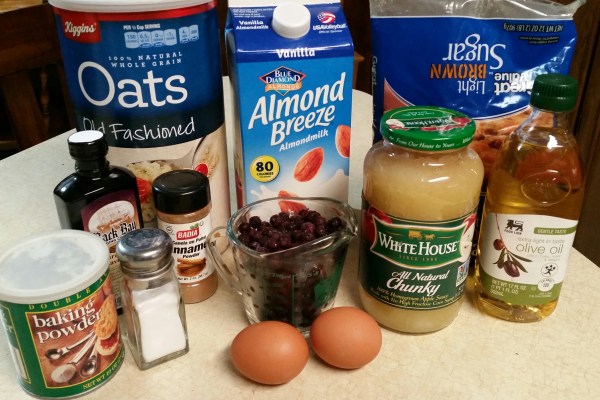
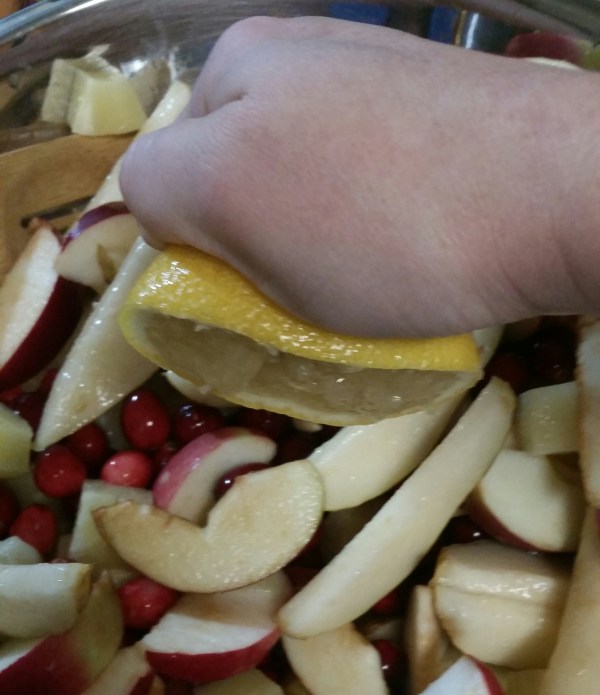
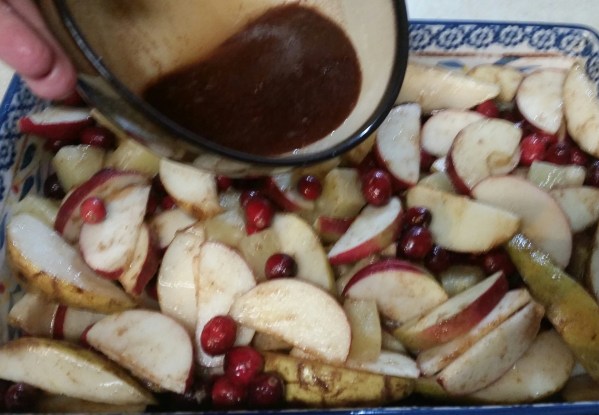
If you like cranberries, this is for you! The tart cranberries added to the sweet fruit and spices leave you wanting more! It took me back several years and reminded me of the rhubarb pies my grandmother used to make – minus all the sugar that she put in them!!  After the first taste, my boys immediately thought it needed more sugar, not me!

  • 2 cups sliced apples
  • 2 cups sliced pears
  • 1 bag or 1 1/2 cup fresh cranberries
  • 1 can of chunk pineapple (save the juice)
  • Juice from 1 lemon
  • 1 Tablespoon Honey or Agave
  • 1 teaspoon Cinnamon
  • 1/4 teaspoon Nutmeg
  • 1/3 cup Coconut Sugar (or regular sugar)
  • 1/2 stick melted butter
  • 1/3 cup Walnuts  (if desired)

Preheat the over to 300°.

Slice the apples and pears.  Mix the apples, pears, pineapple and cranberries in a large bowl.  Squeeze the juice of the lemon over the fruit.20161218_083733-1

In a separate bowl, mix the melted butter, honey, sugar, spices and half of the saved pineapple juice.  Pour half of that mixture over the fruit and mix.  Pour the balance of the mixture over the top.

20161218_084641-1

Bake 1 hr on 300°.  I love the way this makes my kitchen smell…. like apple cider.

20161218_173656-1

This can be eaten for breakfast, brunch, as a side dish or dessert.  Enjoy!