Canning Ground Beef or Venison

When I say I’m canning ground meat, people look at me like I’m crazy….why would I want to can it when it’s “just fine” in the freezer.

Here’s a couple of my reasons:

  1. To free up freezer space
  2. To increase the longevity of the meat. Canned meat lasts years longer than frozen meat
  3. A little work done up front saves a lot of time in the long run
  4. To prevent my meat from ruining in the event of a power outage

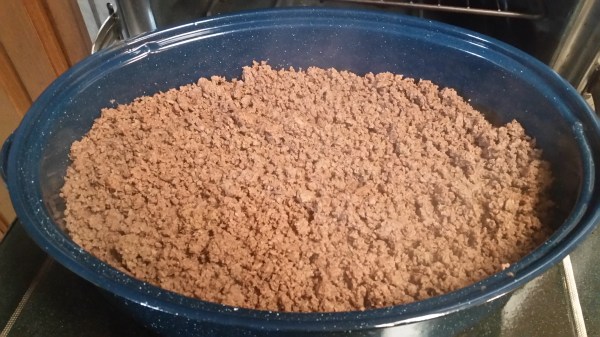
Keep in mind, 2 lbs per quart jar, 1 lb per pint.  When I can mine, I like to do at least a canner full, 6 or 7 quarts.  As I’m browning meat, I get a roasting pan ready and store the meat in the oven on warm until it’s all browned.

20170605_160703


20170605_164000

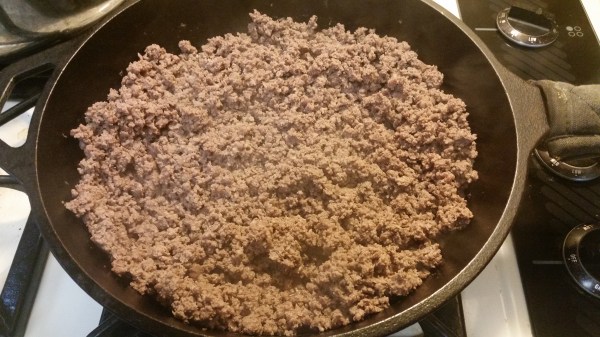
When canning dry meat, I make sure all the jars are boiled thoroughly.

20170605_162953

Fill the jars leaving 1 inch head space.  The meat will draw up during processing.  We are canning this dry, so no liquid will be added.

20170605_184549

Pressure can for 90 mins on 10 lbs of pressure.

20170605_215246-1

Now you’ve just saved yourself a lot of time in thawing and cooking ground meat for tacos, spaghetti, ground steak (it’s a Surry County thing) along with many more possibilities.

Pico de Gallo

I’m a fan of any type of Mexican food so when we decided to host a get together for our Sunday School class it was only fitting that we have a Taco Bar!

Pico de Gallo is a MUST!  Not only is it good – but it’s good for you!

20170520_144527

  • 1/2 purple onion, diced
  • 6 roma tomatoes, diced
  • 3 medium garlic cloves, minced
  • 1 bunch cilantro, chopped
  • 1 small jalapeño, diced
  • juice of 1 lime
  • sea salt & pepper to taste

Dice the tomatoes and onion. Add to a medium bowl.  FINELY dice the jalapeño removing any seeds to make it more kid friendly.  Add to the tomato/onion mixture.  Mince the garlic and roughly chop the cilantro to add to the bowl.   Juice the lime over the bowl, add salt and pepper to the desire taste. Refrigerate at least 1 hr before serving.  ENJOY!

PS…stay tuned, I will figure out a way to can this recipe this summer!

20170520_162413

Strawberry Rhubarb Jam

Some of my fondest memories of Grandma’s kitchen involve a strawberry, rhubarb combination.  She used to make some of the best cobblers!  She never measured anything and I’d get tickled when she cooked with rhubarb.  She would add what she thought was enough sugar, then she’d add a little more just for good measure!  I had to figure out a way to get that combination of tart sweetness into something that I could eat in much smaller portions. There’s something about combining the sweet strawberries with the tart rhubarb that makes a blissful combination and leaves you wanting more.   When I tasted this jam, I could close my eyes and envision standing back in Grandma’s kitchen.
Rhubarb can be hard to find in my area until late May.  Sometimes, you can find it at the Farmer’s Market or the grocery store.   I got super excited when I found some at Food Lion last week!  I never remember year from year what I pay or how many cups a pound will yield.  This year rhubarb costs averages $2.50-$3.00 a pound and it yielded approximately 4 cups.
  • 8 cups rhubarb, cut into small 1/2 inch, or smaller, pieces
  • 6 cups strawberries, mashed
  • 6 cups sugar, cut in half
  • 1 pad of butter
Wash strawberries and rhubarb very good.  Cut rhubarb stalks into small pieces.
Cover the rhubarb with 3 cups of sugar, set aside and and let it set 1 to 2 hours.
Cap and mash the strawberries and mix with remaining 3 cups of sugar and set aside combine or 1 to 2 hours.
20170529_194310
Combine the strawberries with the rhubarb in a pot on the stove and cook on low until all the sugar is dissolved, then boil rapidly, stirring frequently to prevent sticking.
20170529_204032
When it begins to foam, add a little bit of butter and watch how quickly the foam disappears!  Skim off any foam that doesn’t disappear.
Continue to cook until thick, continually skimming the foam off of the top.  The whole cooking process will take about 45 minutes from start to “thick”.
20170529_211242-1
After 25 to 30 minutes into the cooking process, get your canning supplies ready.  Start a water bath canner about half way full of water and a pot of water for your lids.  Turn the oven on 200 degrees and  put your sterile jars in the oven to get them hot.  Once the jam is ready, pour it into sterilized jars leaving 1/4 inch headspace.  Wipe rims, place lids, tighten rings and place in hot water bath.  Process for 15 minutes and let sit for an extra 5 minutes before taking out of the canner.
This recipe yielded 11 of the 4 oz jelly jars.

Canning Swedish Meatballs

I’m all about canning things to make meal prepping quick and easy.   Oftentimes, we have last minute guests for dinner and I need to be able to throw something together quickly.   Unexpected guests used to throw me into a tail spin hunting for something to cook; not anymore, now I simply go into the basement and grab a jar.

Thanks to my husband who loves change we’re adding Swedish meatballs to that menu…

For 7 quart jars, here’s the ingredients you will need.

  • Ground Beef or Venison – 5 lbs
  • Garlic cloves (to taste) we like Garlic so we minced 4 cloves
  • Onion – 2 medium, diced and caramelized
  • Italian Bread Crumbs – 2 cups
  • Cream of Mushroom Soup – 6 of the small cans mixed with water. We prefer to use water instead of milk when canning it.

Some recipes call for plain bread crumbs and lots of Italian spices, to us it made more sense to use the Italian bread crumbs and add additional spices if you’d like.  Keep in mind, when you’re canning with spices, they do tend to get stronger in flavor over time.

Cook the onions until they’re caramelized.

20170526_183328

Mix the ground meat, garlic, onions, bread crumbs and any spices by hand. Roll out golf ball size meat balls. Precook the meatballs for 30-45 mins on 350 degrees, until they’re done.

Once all of the meatballs are cooked. Place the sterile jars in the oven to get them hot.  Start the canner with water and start the pot of boiling water for the lids.

Mix the cream of mushroom soup up per the directions.  I like to keep a few extra cans of soup on hand just in case you run out of soup.  If needed, it takes just a minute to get more going to add to extra jars.

20170526_205612

Pack the jars full of meatballs and pour the hot soup over the meatballs.  Leave 1 inch of head space.

20170526_210107

Wipe the rims with a sterile cloth, place the lids/rings and hand tighten.   Pressure can for 90 minutes on 10 pounds of pressure. *NOTE, based on your elevation,  your pounds of pressure may be different.  Adjust accordingly.

Enjoy!

Strawberry Pie Filling

This comes in so handy when you need a quick dessert for a get together or last minute guests.  Open a jar of Strawberry Pie Filling, pour it into a pie crust, bake and you’ve got Strawberry Pie in no time!
This recipe, as listed below, yields 4 quarts.  As always, I canned big.  I more than doubled the recipe and it yielded 10 qts.
 20170522_201145
Ingredients for 4 qts:
  • 16 cups (4 lbs.) strawberries, sliced
  • 3 1/2 cups white sugar
  • 1 1/4 cup Clear Jel, can be purchased from most local Amish Stores.
  • 4 cups water
  • 4 1/2 Tablespoons lemon juice
Slice strawberries and set aside.  I got really lucky this time!  I had a friend to call me and ask if I could use some strawberries.  She’d worked herself sick of strawberries that week!  She had some that she was ready to throw out; not because they were bad, but because she was sick of strawberries!   The berries were already capped and ready to go!  I felt like I had won the lottery!  Thank you my dear friend!!!
Preheat the oven to 200 degrees to get the jars hot, start a water bath canner with water and start a pot of boiling water for your lids.  Once you get started, this is going to go quick.
In a large pot, combine sugar, Clear Jel, water, and lemon juice. Bring to a boil over medium heat, stirring constantly.   This stuff will stick and scorch in a second with no notice, so stir, stir, stir!
20170522_202655
Within 5-7 minutes it will begin thickening, gel, and begin looking like this:
20170522_203334
Stir or fold in the strawberries once the mixture is thickened. This stuff will thicken even more the cooler it gets.  (Yes, I really did put all 40 cups of strawberries in the pot!)
20170522_203856
Spoon the hot mixture into sterile mason jars leaving 1 & 1/2 inch headspace.  This headspace is important!  If you don’t leave the full 1 & 1/2 inch headspace it will bubble out and make a mess while in the water bath canner.  I even had one to blow the lid!  Thank goodness, I had my canner lid on, or else that would have been one big mess!
20170522_212615
Water bath 30 minutes.  As the jars sit, don’t be surprised if pie filling run out from under the lid and down the side of a few jars, they will still seal.  I had a few do this.  The only thing I can figure is those needed 2 inches of head space! I left them be, let them do their thing and washed the jars the next morning as I removed the rings.

Mexican Spinach Dip

Ok, so I decided to test this recipe on a large group of friends at our Saturday Night Taco Bar.  And I have to warn you right from the start – this is not diet friendly!  Now that we have that behind us….. I needed a dip of sorts, some sort of appetizer to go along with the salsa and guacamole.  With a guest list of 50, I figured that I had better make a double batch.  I knew right away that it was a hit!  So for all of those that asked for the recipe, here you go!

The ingredients below are for an 8×8 pan.  I actually doubled the recipe when I made it and it filled up the 9×13 perfectly.

20170520_075017

  • 1 (8-ounce) package cream cheese, softened
  • ⅓ cup sour cream
  • 1 large jalapeño, seeded and chopped fine **Optional
  • 2 (10-ounce) cans Ro-Tel tomatoes, drained
  • 1 small onion, chopped fine
  • 1 (10-ounce) box frozen spinach, thawed and squeezed dry
  • 3 cups shredded extra sharp cheddar cheese
  • 1 teaspoon salt
  • ½ teaspoon chili powder
  • ½ teaspoon ground cumin
Preheat oven to 350 degrees. Spray 8-inch square baking dish with non-stick cooking spray.  In a large bowl, mix together cream cheese, sour cream, salt, chili powder, cumin and jalapeño (if desired).
20170520_085709
Fold in tomatoes and onions.
20170520_090021
Then add the spinach and cheddar.
20170520_090208
Mix until well combined.  Spray the baking dish with cooking spray, (you’ll thank me later).  Pour mixture into prepared baking dish.
20170520_090652
At this point, I knew I was in trouble!  The moment I sampled the spoon before it went into the dish water, I texted a friend and warned her that this was going to be insanely delicious.
Bake 25-30 minutes, or until the edges are bubbling and golden brown. Serve with tortilla chips.
20170520_183550
To make this more kid friendly, I left out the jalapeño.
Talk about good!!!  Wow….this was amazing!  The only bad thing was due to all of the cheese aka calories,  this will be made only when attending parties. It’s too addictive!  I could have eaten it all by myself which truly tests my will power and makes me ever so thankful that my guests loved it and that it all disappeared!

Refreshing…Fruit Salad

When it starts picnic season I start looking for healthy salads and easy throw together dishes to take to the family functions.  This one takes a few minutes to chop, but it’s well worth it!  My bigger problem while chopping wasn’t the time that it took, but keeping little fingers out of it.  My lil rascals love fresh pineapple and kiwi….No fatty dressings, just fresh squeezed lime juice and chopped mint.

20170506_125752

  • 2 Limes, juiced
  • 3 Tbsp fresh mint, chopped
  • 5 kiwis, thinly sliced
  • 1 honeydew melon, diced
  • 1 pineapple
  • 1/2 lb green seedless grapes
  • 3 Granny Smith apples, diced
Juice the 2 limes, add the chopped fresh mint and set aside.
20170506_130711-1
Peel and thinly slice the kiwis.  Cut up the pineapple and honeydew melon.  Wash and slice the grapes in half.   Dice the apples – last, the longer they sit the darker they get.  I have squeezed a fresh lemon over these before just to keep them from turning brown.  Be sure to cut all of your fruit into small bite sized pieces.  Once all of your fruit is ready pour the lime/mint mixture all over your fruit and lightly toss to combine everything together.  It’s better if refrigerated for one hour prior to serving.
Some call it a “Mojito” salad, I just call it GOOD!  I do think that it would be perfect for a St. Patty’s Day event….

Honey Glazed Carrots

This makes for a good side dish.  They’re sweet, tender and delicious!   What I love about this recipe is I literally put it in the crockpot and forget it.

20170416_081222-1

  • 2 lb Baby Carrots
  • 3 tbsp Honey
  • 1 tbsp Maple Syrup (optional)
  • 3 tbsp Brown sugar, packed
  • 1/4 tsp Salt
  • 2 tbsp Butter, chunked
  • 1/4 cup Water

Place carrots in crockpot and drizzle the honey, maple syrup, water, brown sugar, salt and butter in a medium to large crockpot.

20170416_081727

Set it on High for 5-6 hours. Stir carrots after 4-5 hours of cooking.  The less you stir the better.  If you notice that all the liquid is evaporating before the carrots are tender, add more water.  Add this to a Sunday dinner and watch your family enjoy carrots like never before….they’re so good!


Baked Ham (Perfect for Holidays and Big Family Gatherings)

Often times, at Easter we try to have the non-traditional meal but when we decide to have ham it is truly delicious.  It never fails, we forget year to year how to make it and which ham produces the best meal so we call on our dear friend Angel to keep us straight.  So here we’re giving credit where credit is due…we took her advice and the outcome was simply delicious!

20170416_084144

  • 7-10 lb ham (butt not shank)
  • 2 cups of water
  • Juice from 29 oz can of peach halves in heavy syrup
  • 1/4 cup brown sugar

Pour the water into a roasting pan with the ham and place in the oven for 2 hours at 275 degrees.  Since the ham is precooked, it simply needs to be warmed thoroughly.

Pour the juice out of a can of peach halves and mix with the brown sugar.  As you slice the ham, slowly pour the syrup over the ham.  Place back in the warm oven until ready to serve.

20170416_121623-1.jpg

No Bake Banana Pudding

This is not your typical banana pudding for a couple of reasons but mainly because it doesn’t have to be baked!  Let’s be real a minute….who doesn’t love banana pudding…… This is truly a treat at our house as we do not indulge in full fledged banana pudding very often, just on special occasions.

So here goes….

20170415_085309

  • 8 ounces sour cream
  • 2 of the 3.4 ounce packages instant french vanilla pudding mix
  • 2 cups milk
  • 8 ounce container frozen Cool Whip whipped topping, thawed
  • 16 ounce package vanilla wafer cookies
  • 7 bananas, peeled and sliced

In large bowl combine sour cream, pudding mix and milk. Stir well with a mixer. Fold in the whipped topping.

20170415_090327

Layer in a baking dish or trifle bowl a layer of cookies, a layer of bananas and a layer of pudding mixture.

20170415_090838

Repeat until all ingredients are used or your bowl becomes full.  Save a few cookies for decoration.  Refrigerate until serving.  Makes about 8-10 servings.

20170415_092635